Help Center
This guide is designed to help walk you through the account setup and takes only a few minutes. Whether you are a beginner or an experienced print on demand user, this guide will provide step-by-step instructions to ensure a smooth and successful setup process. This simple setup guide will get you up and running as quickly as possible.
Connect Your eCommerce Store
Select “Stores” from the left side navigation. If you have a Shopify store, select the Shopify “Connect” button.
You will be navigated to our Shopify application page, select “Add App” from the left side navigation. Shopify will prompt you to login to your Shopify eCommerce store. Once logged in to Shopify, follow the authentication process for the PODx print on demand application. Congratulations, your Shopify store is now integrated with PODx.
Customize Your Branding
The branding section allows you to customize the packing slip included in every order sent to your customers. All orders delivered to your customers have your company branding and messaging as if it came right from your manufacturing facility.
Select “Stores” from the left side navigation. Select the “Branding” sub menu item under the stores section.
- Contact Details:
- Add your contact phone number and email. This is used as a reference for the PODx team to contact you if you need assistance with this store.
- Logo
- This logo displays at the top of your packing slip included in every order sent to your customers.
- Download the template, you can use this as a reference to ensure the logo you upload meets the requirements;
- 4" x 0.6" (2400 x 360px) @ 600DPI
- Packing Slip Details
- Branding Message:
- Add a branding message to your customer highlighting your company and what you stand for.
- Contact and Support Message:
- Add your contact and support details. Many of our clients also add their social media links here as well.
- QR code functionality:
- Select the “QR code & Text” radio button if you would like to add a QR code to your packing slip.
- Add a URL in the text box that appears, when a customer scans the QR code it will navigate them to the URL you entered.
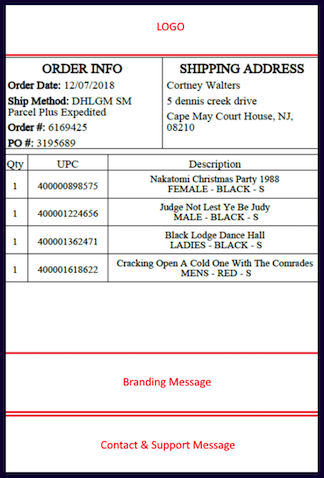
This image outlines where each item in the branding section will display on your packing slip:.
Store Settings
Select “Stores” from the left side navigation. Select the “Settings” sub menu item under the stores section.
- Store Details:
- The name you add in “Store Name” will be displayed on the shipping label and packing slip for orders delivered to your customers.
- Store Synchronization:
- Update stock availability automatically
- If selected, when a variant is out of stock for a product you designed, this option will be automatically hidden on your eCommerce store to avoid a customer ordering something out of stock.
- Order Approval:
- By default we set this to “Manual Approval”. When selected, you will need to review every order in PODx and approve the order to be sent to manufacturing. As you get comfortable with PODx and our reliability, you can change this to “Automatic” at any time. When order approval is set to “Automatic” orders will automatically be processed and sent for manufacturing.
- Not Connected Order Processing:
- By default “Process orders with disconnected products immediately” is selected.
- When a customer on your store completes an order with products created from PODx and additional products you sell, we will process the order immediately for the PODx products and ship them to your customer.
- Shipping Configuration:
- “Enable PODx Standard Shipping” is selected by default.
- You can reference our flat rate shipping rates for product types here. At checkout on your eCommerce store, this shipping rate will be added to the total cost of the order. When we process this order in PODx, we will bill you the same flat rate amount.
- “Enable Free Shipping”
- If selected, At checkout on your eCommerce store, there will be no shipping cost added to the order. We will still bill you our standard flat rate shipping charge for the product when it is processed for manufacturing.
Billing - Add Funds
Add funds to your wallet. When an order from your eCommerce store is placed and processed through PODx, we will deduct the PODx cost from your wallet balance.
Select “Billing” from the left side navigation. Select the “Payments” sub menu item under the stores section. Select the “Add Funds” button at the top right of the page. Follow the wizard for topping up your wallet with funds. You can request a refund at anytime to receive the money you added to your wallet back to your bank.

Billing - Settings
- Primary Billing Address:
- Add the primary billing address for your business.
- If you connect multiple eCommerce stores, you can update a unique billing address for each store if you would like.
Settings
- Personal Information:
- Add the first and last name. If you need assistance from our team we will refer to this information.
- Product Management:
- By default your product management view is “Standard”
- If you only have 1 store connected to PODx, this view will simplify your product creation process. Functionality is hidden that is specific for users with multiple stores connected to PODx.
- Omni-Channel View:
- Use this view if you plan to push the same products to multiple stores/channels. You will see the “My Products” section in the left side navigation where you can manage product templates.
If you have any questions or need assistance, please send an email to support@podx.net. Our PODx team is happy to help you through the setup process.